A Simple Nerve Glide Routine for Better Splits
A Simple Nerve Glide Routine for Better Splits
Have you tried every stretch, every overstretch and all the equipment to try and improve your splits? Sometimes it’s not just the muscles that need a stretch but also the nerves that travel along with your muscles. Try this exercise and see if your splits improve…
1. Set Up With Two Blocks
Place two yoga blocks under your hands to lift your torso and give your nerves more room to move. This setup reduces strain and helps you maintain proper alignment.
2. Keep Your Back Flat
A neutral spine is key. A rounded back can tug on the nerve pathway, making the glide less effective.
3. “Wag Your Tail”
Think of your pelvis as a tail you can gently sway. This movement encourages the nerve to glide without forcing a stretch.
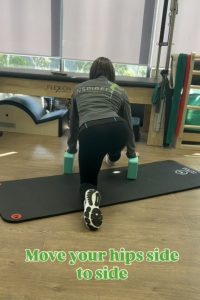
4. Move Side to Side
Shift your hips left and right. These small lateral movements help free up tension along the back of the legs.
5. Move Forward and Back
Rock your weight forward and back to explore different angles of nerve mobility. Keep the motion smooth and controlled.
6. Explore Any Direction
There’s no single “right” way to glide. If a movement feels good and doesn’t create sharp pain, it’s fair game. Let your body guide you.
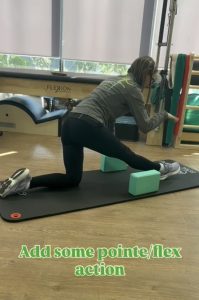
7. Add Pointe and Flex
Gently point and flex your foot. This adds a dynamic component to the glide and helps mobilise the nerve all the way down to the ankle.
8. Practice Your Square Splits
Once your nerves are gliding freely, revisit your splits. Focus on keeping your hips square — you may notice it feels more accessible and less twisty.
Why This Works
Nerve glides don’t force flexibility; they restore movement. When your nerves can slide without restriction, your muscles stop over‑protecting, your alignment improves, and your splits feel more natural.
If you’ve been stretching endlessly without seeing progress, this might be the missing piece.


